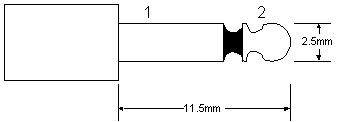
Figure 1:
1-2: Measure and release
My first choice of camera for kite aerial photography was the compact camera RICOH FF9. The advantage was the weight, the internal film transport, the connector for electrical shutter release and the possibility to switch off the auto focus. The camera was fixed by a screw on the camera carrier. Disadvantage is to use slide films. The brightness between center and corners on photos were very different.
Meanwhile I use the RICOH FF10 (Shotmaster), too. The focal distance is changeable between 38mm and 60mm. The point of the screw to fix the camera on the camera carrier is different to the FF9.
The advantage of reflex cameras are the large amount of very good and changeable object lens. The eye piece should be closed, because it may cause problems during measure by light from backwards.
With my second camera station I had the possibility to use my reflex camera
RICOH KR10. Therefore I had to handle with the following disadvantages:
Today video cameras are very compact with a small weight. My AKAI PV-MS8 is fixed with a screw to the camera carrier. Just before lifting the system I start the video camera. The automatical focus is switched off and set to infinity. The focal distance is set to a short distance. Video cameras have the advantage to see the result immediately. And if the video is nou useable you can start once more. Changing directions of the camera should be very slow. Otherwise you will get problems while regarding that video.
The shutter of most older reflex cameras could be released mechanical with a wire. Most newer cameras with auto focus have a special connector for electrical release of the shutter. Most compact cameras have no connector for external shutter release. On some cameras you can make a small modification to add an external electrical shutter release. If you fear to do this modification you have to look for a camera with a built in connector. Perhaps your photo dealer has such a camera.
The following table shows all cameras with external electrical shutter release I know:
        Camera name             Camera type     Focal distance  Connector
        -----------------------------------------------------------------------
        CANON EOS 1             Reflex          Interchangeable (?3?-?)
        CANON EOS 3             Reflex          Interchangeable (?2?-?)
        CANON EOS 5             Reflex          Interchangeable (?3?-?)
        CANON EOS 500           Reflex          Interchangeable Figure 2
        CANON EOS 620           Reflex          Interchangeable (?3?-?)
        CANON EOS 5000          Reflex          Interchangeable Figure 2
        CANON T50               Reflex          Interchangeable Figure 3
        CONTAX G1               Point&Shot      Interchangeable (?1?-?)
        CONTAX G2               Point&Shot      Interchangeable (?1?-?)
        MINOLTA Dynax 7000i     Reflex          Interchangeable (?4?-3)
        MINOLTA Dynax 8000i     Reflex          Interchangeable (?4?-3)
        MINOLTA Dynax 9000i
        (USA: Maxxum 9000)      Reflex          Interchangeable (?4?-3)
        MINOLTA 800si           Reflex          Interchangeable (?4?-3)
        MINOLTA 700si           Reflex          Interchangeable (?4?-3)
        MINOLTA 600si           Reflex          Interchangeable (?4?-3)
        MINOLTA 9xi             Reflex          Interchangeable (?4?-3)
        MINOLTA 7xi             Reflex          Interchangeable (?4?-3)
        MINOLTA 5xi             Reflex          Interchangeable (?4?-3)
        NIKON F90x              Reflex          Interchangeable (?5?-?)
        NIKON F-100             Reflex          Interchangeable (?5?-?)
        NIKON F5                Reflex          Interchangeable (?5?-?)
        NIKON F70               Reflex          Interchangeable (?6?-2)
        OLYMPUS OM2             Reflex          Interchangeable Figure 1
        OLYMPUS OM4             Reflex          Interchangeable Figure 1
        PENTAX MZ-50            Reflex          Interchangeable (?7?-?)
        PENTAX MZ-7             Reflex          Interchangeable (?7?-?)
        PENTAX MZ-5n            Reflex          Interchangeable (?7?-?)
        PENTAX Z1P              Reflex          Interchangeable (?7?-?)
        PENTAX MZ-3             Reflex          Interchangeable (?7?-?)
        RICOH FF9               Compact         35 (fix)        Figure 1
        RICOH FF10
        (USA: Shotmaster)       Compact         38-60 (Zoom)    Bild 1
        RICOH KR10M             Reflex          Interchangeable Bild 1
        RICOH XR-X              Reflex          Interchangeable Bild 1

Figure 1:
1-2: Measure and release
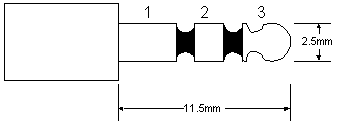
Figure 2:
1-2: Measure
1-2-3: Release
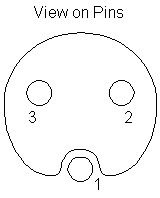
Figure 3:
Special connector for Canon
1-2: Measure
1-2-3: Release
In the beginning of kite aerial photography a camera was fixed inside the kite. But with unstable flight near the ground a damage of camera or camera station is possible. The camera fixed inside the kite affects the center of gravity and the flying conditions of the kite. So, it is better to avoid to fix a camera near the kite.
A better solution is to fix the camera station on the flying line of a stable flying kite. The kite has already reched a hieght for stable flight and the Load in the line did not affect the kite flying. The camera station is fixed to the kite line by a suspension, which can be a pendulum or a picavet suspension.
A pendulum suspension is made by 2 sticks or tubes. One is fixed on both ends to the flying line and prevents turning of the system. The other one is fixed on one and to the middle of the first one and on the other end to the camera station. Depending on the load the camera station hangs always straight downwards independent from the angle of the flying line. With changing the angle of the flying line the pendulum suspensions starts to swing. With a dampener you can reduce the swinging of the system.
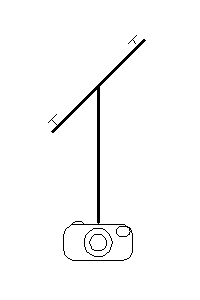
Leading a line in a special way between the 2 fixing points on the kite line and the four points on a horizontal table on the camera station the system stays more stable. With changing the angle of the kite line the camera station goes back to the deepest position without turning and swinging. If the distance between the two fixing points on the kite line are too short this suspension works like a pendulum with all its disadvantages.
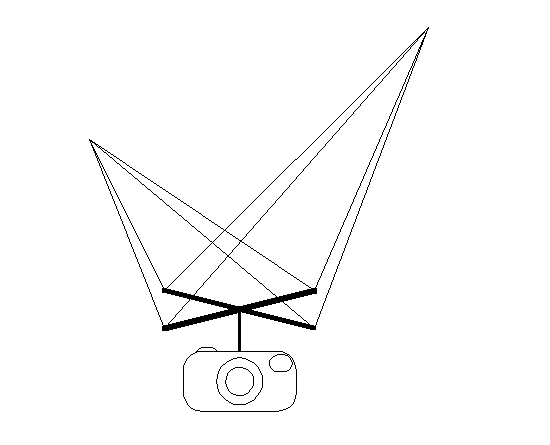
My first Picavet suspension was built of a cross with a diameter of about 500mm. I had to dismount this cross to put it in my bag. By mounting the cross it was possible to twist the spares of the cross. Ralf Beutnagel and Wolfgang Bieck had reduced the diameter of the cross extremly. Wolfgang has a diameter of 80mm. I think, this is a limit, because it need an exact mounting of the camera rig. Building my crosses by two flat alloy pieces I use a diameter of 200mm. This is small enough to get no problems, if the rig is not fixed exactly. The last crosses were made out of one piece and had a diameter of 80mm to 100mm. They are waste of rotation cutters and so I had no chance of other sizes. My rig for panorama photos is build so exactly, that there is no side move by turning the rig.
To lead the line on the cross I used screws with an eye (4mm) or pieces to fix pictures to the wall. In newer rigs I use ball bearing rolls, which I got from Ralf Beutnagel. With the rolls the rig starts earlier to eleminate movements as screws and picture holders. But these rolls costs lots of money.
On the big cross I used a 3mm Polyamid line with a length of about 15m. For the picture holders I used 1.5mm Polyamid line. After that I used screws with spectra (75daN) and a length of 15m. For the rolls I took spectra with 75daN and 50daN. I reduced the length to 10m. In my opinion a long line works better ie. for high flying kites (Multiflare). But it is difficult to hold the suspension for fixing in the flying line. You always have to hold your arms over your head. With 10m line it is better to work with the line of the suspension. The spectra line works better as the polyamid line even without rolls.
The two fixing points on the flying line are set in that way, to get a good work point for the suspension. Wolfgang Bieck had tested different work points and said, the distance beetween to points on the cross has to be the same as the distance between a point on the cross and the ring in the line. You cannot set this work point exactly, because it will change during flying condition. If the kite flies with a higher angle the distance between the two points on the flying line will be shorter and it will work more as a pendulum.
Ralf Beutnagel has tested different kinds Picavet suspensions and wrote an article about it. After his description, I decide the line setting for the suspension like the Rendsburg cable car. In this way there is no side turn by changing the flying angle of the kite.
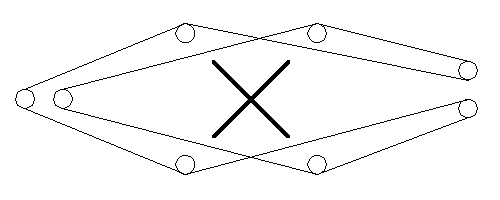
With pendulum suspensions the fixing on the kite line most times is done by leading the kite line around the fixing elements. Depending on the pulling force it is difficult to fix or remove this suspension to a kite line.
With picavet suspensions the fixing on the line is done with a Prusik-knot. It was fixed on the strong line of the kite ans is moveable until you pull the knot. Than fix the two upper points of the suspension to these loops of the Prusik knot. It is easy to fix and remove the camera system without any problems by the pulling force of the kite.
There are differnt ways to fix a camera station to the suspension. Sometimes the suspension may be a part of the camera station. Important on removeable camera stations is a save fixing without affects by turning.
The fixing between the suspension and the rig I made first with corner profiles of alloy and two screws. It was difficult to set this fixing exactly, but therefore it was easy to handle. For the screw is no safety pin nescessary. This kind of fixing I used for pendulum suspension and for the Picavet-suspension until spring 1995.
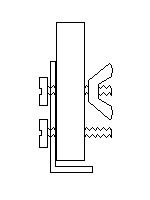
The second way of fixing were two tubes with different diameter. One tube fits into the other and was fixed with a safety pin. This kind of fixing was not exact enough, because it was possible to turn the tube even with fixing.
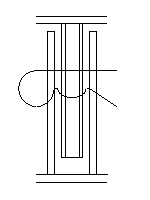
The latest kind of fixing has a hole in the cross. The rig is fixed to the suspension with a screw of 4mm to this hole. To safe the fixing there is a safety pin through the screw. The advantage of this kind of fixing is the flat suspension.
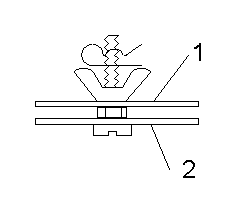
        1 - Suspension (Picavet)
        2 - Camera station
My fixing between suspension and camera station is always done with metal parts. Most times I use screws with a diameter of 4mm. I have seen pendulum suspensions made of carbon tubes. But I do not trust them. To fix the camera carrier smaller screws are possible, because of the two fixing points.
[ Index ] [ Contents ] [ Top of Page ] [ Next Page ]
©2015 Harald Prinzler